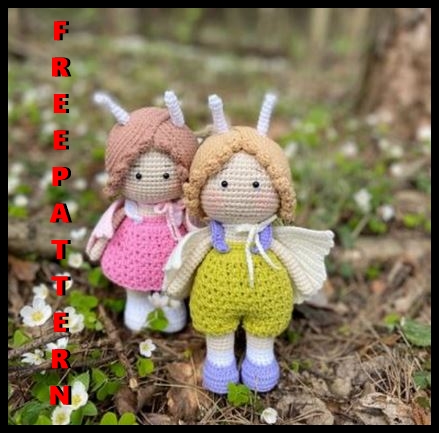
Butterfly Dolls Free Amigurumi Pattern
Hello dear Amigurumi Followers
Today we share one free amigurumi crochet pattern again for you. As you know we share new amigurumi free patterns every day. The main crochets are amigurumi gazelles, amigurumi bears, amigurumi pola, amigurumi pandas, amigurumi penguins, amigurumi giraffes, amigurumi llama, amigurumi pigs, amigurumi bunny, amigurumi clowns, amigurumi lambs, amigurumi bees, amigurumi unicorns, amigurumi dolls, amigurumi foxes, amigurumi penguins, amigurumi dinosaurs, amigurumi elephants, amigurumi hippos, amigurumi monkeys, amigurumi cats, amigurumi dogs and more …
Todays daily new amigurumi free crochet pattern is amigurumi doll
I want to give you some informations about this pattern ;
If you enjoy making amigurumi, here I share this easy and free amigurumi pattern for you for free. Your kids will love these toys.
Pattern: @happydolls_pattern
Materials needed:
1. Yarn YarnArt Jeans, 55% cotton, 45% acryl, 50g/160m:
First color variation of Butterfly Doll:
• basic yarn for body nude color № 05
• for the dress pink color № 20
• for the hair brown color № 71
• for the boots white color № 62
• for the wings light-pink color № 7
Second color variation of Butterfly Doll:
• basic yarn for body nude color № 05
• for the overalls green color № 29
• for the hair beige color № 07
• for the boots lilac color № 89
• for the socks white color № 62
• for the wings milk color № 03
2. Crochet hook 2mm or 2.25mm (US: B, UK:14)
3. Holofiber, thick sewing needle, pins.
4. 5mm black plastic beads for eyes, piece of cardboard 3 on 2.5 inch for one doll’s sole.
If you follow this advice your toy will be 20-21 cm high.
Abbreviations:
MR – magic ring
ch – chain stitch
sc – single crochet
dc – double crochet
hdc – half double crochet
sl st – slip stitch
inc – increase, 2 sc in the next stitch
dc inc – increase, 2 dc in the next stitch
dec – decrease, sc2tog, single crochet 2 stitches together
(16) – number of stitches in a round
(inc, sc)*N – repeat N times
BLO – back loop only
Head
Work with the basic yarn in continuous rounds without slip stitches.
R1: 6 sc in MR.
R2: 6 inc (12)
R3: (inc, 1 sc)*6 (18)
R4: (inc, 2 sc)*6 (24)
R5: (inc, 3 sc)*6 (30)
R6: (inc, 4 sc)*6 (36)
R7: (inc, 5 sc)*6 (42)
R8: (inc, 6 sc)*6 (48)
R9: (inc, 7 sc)*6 (54)
R10: (inc, 8 sc)*6 (60)
R11- 18: 6 0 sc
Set eyes between 15 and 16 rounds. Distance between eyes
6 sc.
R19: (dec, 8 sc)*6 (54)
R20: (dec, 7 sc)*6 (48)
R21: (dec, 6 sc)*6 (42)
R22: (dec, 5 sc)*6 (36)
R23: (dec, 4 sc)*6 (30)
R24: (dec, 3 sc)*6 (24)
Stuff the head evenly with holofiber.
R25: (dec, 2 sc)*6 (18)
R26: (dec, 1 sc)*6 (12)
Add some more holofiber. The head should be stuffed firmly and evenly.
R27: 6dec (6)
Cut off the yarn, tie up and fasten off.
Legs and body
Work with the yarn for boots.
Ch 7
R1: inc n second stitch, 4 sc, 4 sc in one stitch (work along the other side of the foundation chain), 4 sc, inc in the first stitch (that already has the very first inc) (16)
Go on working in rounds without slip stitches.
R2: 2 inc, 4 sc, 5 inc, 4 sc, inc (24)
R3: 3 sc, inc, 4 sc, (inc, 1 sc)*5, 4 sc, inc, 1 sc (31)
Сut the sole out of cardboard.
R4: BLO 31 sl st, remove marker and crochet 1 sl st more.
R5: BLO 31 sc
R6: 31 sc, insert the sole.
R7: 7 sc, 9 dec, 6 sc (22)
Connect the white yarn.
R8: BLO 7 sc, 4 dec, 7 sc (18)
R9: (dec, 7 sc)*2 (16)
R10-11: 16 sc
Connect the nude yarn.
Stuff the bottom part of the boot very tight.
R12: BLO 16 sc
R13-20: 16 sc
R21: 5 sc, 1 sl st, place the marker. It should be located on the side of the leg, for this you can change the number of sc.
Cut off the yarn, tighten the loop.
Stuff leg as you go.
We will crochet the second leg in the same way R1-20.
R21: 14 sc, ch 2, connect with the first legs in stitch with marker, 10 sc on the first leg.
Place a marker to mark the beginning of a new round.
Attention! legs should be parallel.
R22: 6 sc on the first leg, 2 sc in the chains between legs, 16 sc on the second leg, 2 sc in the chains between legs, 10 sc on the first leg. (36)
R23: 2 sc, (inc, 8 sc)*3, inc, 6 sc (40)
R24-26: 40 sc
R27: (18 sc, dec)*2 (38)
R28: 38 sc
R29: (17 sc, dec)*2 (36)
R30-32: 36 sc
R33: 2 sc,(dec, 7 sc)*3, dec,
5 sc (32)
R34: 32 sc
R35: (14 sc, dec)*2 (30)
Connect the yarn for dress.
R36: 30 sc
R37: BLO 30 sc
R38: (13 sc, dec)*2(28)
R38: 3 sc, (dec, 5 sc)*3, dec, 2 sc (24)
Connect the nude yarn.
R39: BLO 24 sc
R40: 3 sc, (dec, 4 sc)*3, dec, 1 sc (20)
R41-42: 20 sc and crochet 2 sl-st more.
Cut off the yarn, tighten the loop, leaving a long end.
Stuff the body evenly and firmly with the holofiber.
Dress and overalls
Crochet the dress or overalls, putting the hook in free loop of the 36-th round of the body.
Hold the toy head down.
R1: Ch 2, (2 dc in one stitch, 2 dc)*10, (40)
Go on working in rounds with slip stitches.
R2: ch 2,(dc, ch 1, dc)in one stitch, leave one stitch, dc, leave 1 stitch. Repeat to the end of the round.
R3-9: ch 2,(dc, ch 1, dc)in one stitch, leave one stitch
Repeat to the end of the round.
For dress cut the yarn, hide the end.
For overalls:
R10: ch 2,(dc, ch 1, dc)in one stitch, leave one stitch.
Repeat 5 times. Сonnect the half of overalls and continue crocheting around the leg.
R11: ch 1, 1 sc, ch 1, leave two stitch. Repeat 10 times, 1 sl st.
Cut the yarn, hide the end.
Crochet R10-11 for second leg.
Arms
With basic yarn.
R1: 6 sc in the MR (6), go on in continuous rounds without slip stitches.
R2: (inc, 2 sc)*2 (8)
R3-16: sc in each stitch around 14 rounds.
Then squeeze the hole of the hand so that the stitches of the last round line each other.
Crochet the opposite stitches with 3-4 sc.
Cut the yarn, leave a long
end for sewing.
Do not stuff the arms, otherwise they will stick up.
Wings
Work in turning rows.
Chain 23, start with the 2nd loop from the hook.
R1: 22 sc
R2: ch1, 21 sc
R3: ch1, 9 sc, 1 slst (10)
R4: ch1, 9 sc
R5: ch1, 10 sc, 1 slst (11)
R6: ch1, 10 sc
R7: ch1, 5 sc, 1 slst (6)
R8: ch1, 5 sc, inc (7)
R9: ch1, inc, 11sc, 1slst (14)
R10: ch1, 13 sc, inc (15)
R11: ch1, 16 sc, 1 slst (17)
R12: ch1, 17 sc
R13: ch1, 18 sc, 1 slst (19)
R14: ch1, 19 sc
R15: ch1, 5 sc, 1 slst (6)
R16: ch1, 6 sc
R17: ch1, 7 sc, 1 slst (8)
R18: ch1, 8 sc
R19: ch1, 10 sc, 1 slst (11)
R20: ch1, 11 sc
R21: ch1, dec, 11sc, 1slst (13)
R22: ch1, 13 sc
R23: ch1, dec, 13sc, 1slst (15)
R24: ch1, 13 sc, dec (14)
R25: ch1, dec, 15 sc, dec (17)
R26: ch1, 1sc, dec, 13sc, ch3 (18)
R27: ch1, inc, 15 sc, dec (18)
R28: ch1, 1sc, dec, 10sc, ch5 (17)
R29: ch1, inc, 14 sc, dec (17)
Cut the yarn, hide the end.
Crochet the second wing, don’t cut the yarn.
Put the wings together so that the stitches line each other.
Crochet with 7 sc.
Cut the yarn, hide the end.
For ties of the wings ch 40, crochet 8 sc in the middle part of wings, ch 40.
Cut the yarn.
Hairstyle
With yarn for hair. Don’t crochet too tight.
Work only BLO in continuous rounds without slip stitches.
R1: 6 sc in MR.
R2: 6 inc (12)
R3: (inc, 1 sc)*6 (18)
R4: (inc, 2 sc)*6 (24)
R5: (inc, 3 sc)*6 (30)
R6: (inc, 4 sc)*6 (36)
R7: (inc, 5 sc)*6 (42)
R8: (inc, 6 sc)*6 (48)
R9: (inc, 7 sc)*6 (54)
R10: (inc, 8 sc)*6 (60)
R11-12: 60 sc
Cut the yarn, hide the end.
Crochet the second detail, don’t cut the yarn.
We try on a halves of hair, we mark with pins the places of connection of the halves.
Begin to crochet curls.
For curl
R13: Chain 6, start with the 3d loop from the hook, 4 dc, leave 1 stitch below, 1 sl st.
Repeat to the end of round.
Cut off the yarn.
Sew the hairstyle to the head.
Tendrils
With white yarn.
R1: 6 sc in the MR (6), go on in continuous rounds without slip stitches.
R2-9: sc in each stitch around 8rounds
Cut the yarn, leave a long end for sewing.
Stuff the tenrils.
Straps for dress.
Work with the white or lilac yarn.
Chain 15, start with the 3rd loop from the hook.
2 dc in one stitch,1 dc, repeat to the end of row.
Cut off the yarn. Leave a long end for sewing.
Assembly
First sew head up to the body, then sew arms to the body
between 41 and 42 rows.
To decorate the face. Embroider eye with white yarn.
Apply the blushes to the cheeks, using blushes or crayons.
Sew straps and tendrils on the heads, use some pins. Put on the wings.
Congratulations! Your Butterfly Dolls are ready!
I hope you enjoyed the process and now feel happy with the result! It’s high time to hug your toys!