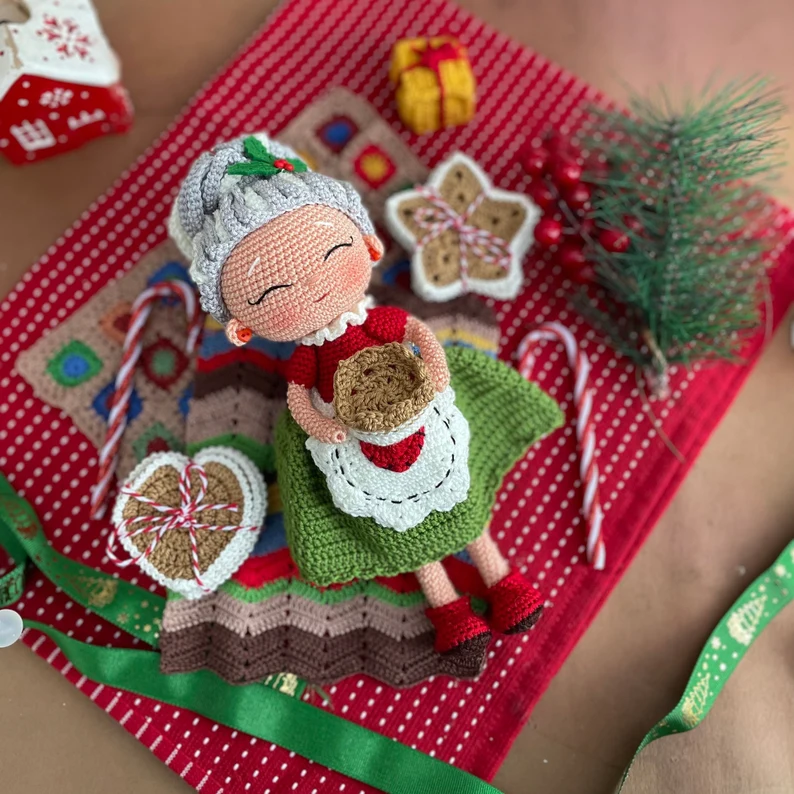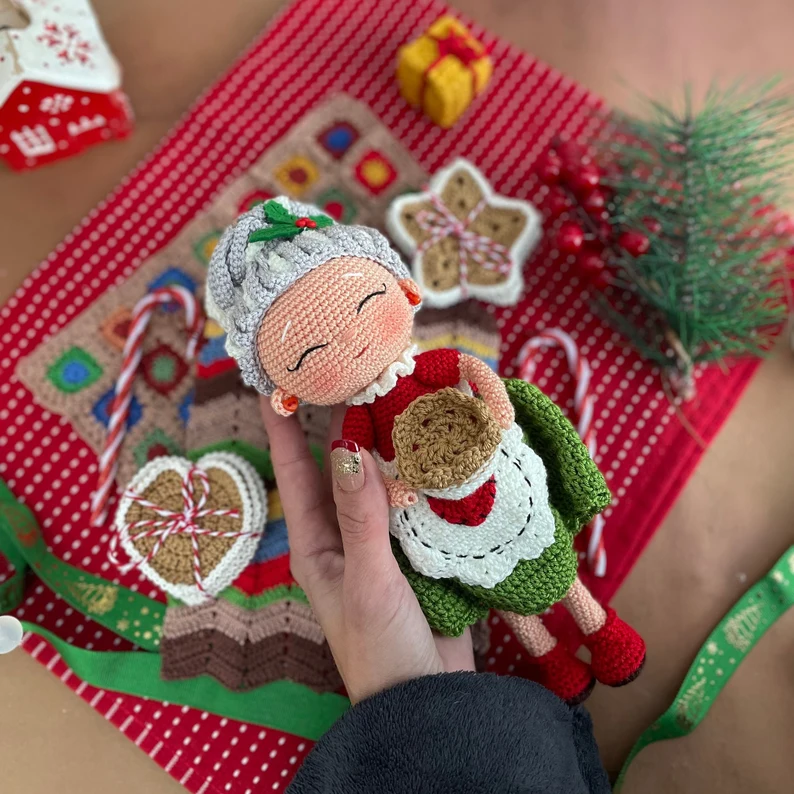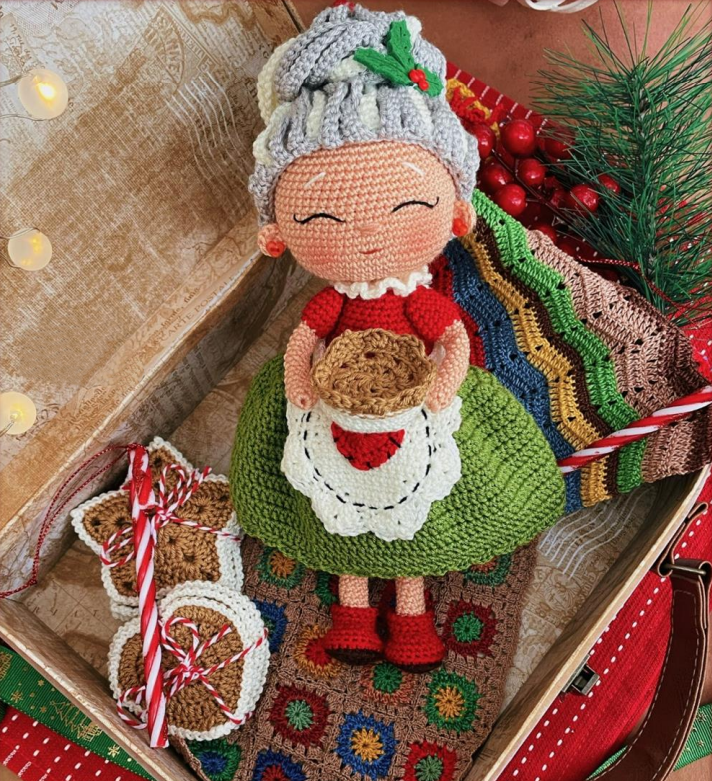
Crochet Cute Grandma Doll Amigurumi Free Pattern
Hello dear Amigurumi Followers
Today we share one free amigurumi crochet pattern again for you. As you know we share new amigurumi free patterns every day. The main crochets are amigurumi gazelles, amigurumi bears, amigurumi pola, amigurumi pandas, amigurumi penguins, amigurumi giraffes, amigurumi llama, amigurumi pigs, amigurumi bunny, amigurumi clowns, amigurumi lambs, amigurumi bees, amigurumi unicorns, amigurumi dolls, amigurumi foxes, amigurumi penguins, amigurumi dinosaurs, amigurumi elephants, amigurumi hippos, amigurumi monkeys, amigurumi cats, amigurumi dogs and more …
Todays daily new amigurumi free crochet pattern is amigurumi doll
I want to give you some informations about this pattern ;
If you enjoy making amigurumi, here I share this easy and free amigurumi pattern for you for free. Your kids will love these toys.
Materials
Alize Diva red 106
Alize Diva green 79
Alize Diva white 62
Alize Diva brown 26
Alize Diva caramel 369
Alize Diva light grey 168
Kartopu Lotus nude colour K277
a small amount of black fine thread
1.50 mm crochet hook )according to the recommended yarns)
needle
scissors
fiberfill
wire (legs, body and neck part)
2 small red heart shaped buttons (for her earrings)
Abbreviations
mr – magic ring
ch – chain
slst – slip stitch
sc – single crochet
inc – increase
dec – decrease
hdc – half double crochet
dc – double crochet
dc inc – double crochet increase
trc – treble crochet
blo – back loop only
flo – front loop only
Legs
Rnd 1. 6 sc in mr with nude colour yarn 6
Rnd 2. 3*(sc, inc) 9
Rnd 3. – 29. 9 sc (27 rows) 9
*** Do not stuff the legs. Wire can be used optionally inside the
legs.(Using wire inside the legs is recommended)
*** Finish the legs and cut your yarn.
Body
*** Join the legs without any chain between them. Attach red
yarn to any loop and start crocheting the body. Stuff the piece
while crocheting.Place the wıre inside the body and neck part.
Rnd 1. 9 inc from the right leg, 9 inc from the left leg with
red yarn 36
Rnd 2. 9(3 sc, inc) 45
Rnd 3. 9(4 sc, inc) 54
Rnd 4. – 9. 54 sc (6 rows) 54
Rnd 10. 6(7 sc, dec) 48
Rnd 11. – 13. 48 sc (3 rows) 48
Rnd 14. 6(6 sc, dec) 42
Rnd 15. Blo 42 sc 42
Rnd 16. 42 sc 42
Rnd 17. 6(5 sc, dec) 36
Rnd 18. – 19. 36 sc (2 rows) 36
Rnd 20. 6(4 sc, dec) 30
Rnd 21. – 24. 30 sc (4 rows) 30
Rnd 25. 6(3 sc, dec) 24
Rnd 26. – 28. 24 sc (3 rows) 24
Rnd 29. 6(2 sc, dec) 18
*** Finish the body and cut your yarn. Attach your nude colour
yarn and continue to crochet the head without sewing.
Head
*** Stuff the head firmly as you go. (especially the cheek parts)
Wire can be used inside the neck.
Rnd 1. Blo 18 sc with nude colour yarn 18
Rnd 2. 6(sc, dec) 12
Rnd 3. 12 inc 24
Rnd 4. 8(2 sc, inc) 32
Rnd 5. 8(3 sc, inc) 40
Rnd 6. 8(4 sc, inc) 48
Rnd 7. 8(5 sc, inc) 56
Rnd 8. 8(6 sc, inc) 64
Rnd 9. – 16. 64 sc (8 rows) 64
Rnd 17. 8(6 sc, dec) 56
Rnd 18. – 24. 56 sc (7 rows) 56
Rnd 25. 8(5 sc, dec) 48
Rnd 26. 8(4 sc, dec) 40
Rnd 27. 8(3 sc, dec) 32
Rnd 28. 8(2 sc, dec) 24
Rnd 29. 8(sc, dec) 16
Rnd 30. 8 dec 8
*** Embroider the eyes with black thread. Embroider the eyes
between 13th and 14th rows, leave 4 sc between each other.
Embroider the nose with nude yarn and embroider the eyebrows
with white yarn. Embroider mouth with fine red thread as shown
in the picture.
Ears
Rnd 1. 6 hdc in mr with nude yarn, slst
*** Leave enough long yarn tail to sew. After placing the wig on
the head, sew the ears. Leave 5 sc between ears and eyes.
*** Sew 2 little red heart shaped buttons on the ears as her
earrings.
Skirt
Rnd 1. Attach your green yarn to the 15th row of the
body and start to crochet her skirt. 21(dc, dc inc), slst 63
Rnd 2. Ch 2, 21(2 dc, dc inc), slst 84
Rnd 3. 21*(3 dc, dc inc), slst 105
Rnd 4. – 12. Ch 2 , 105 dc, slst (9 rows) 105
*** In the last row to the end of the row crochet (1 sc, ch 4, skip 2
sc, 1 sc) and complete her skirt. Cut your yarn.
Collar
Rnd 1. Attach your white yarn to the first row of the head
(blo sc) and 18*(2 dc, ch 2). (2 dc in each sc, ch 2 in
between them) Cut your yarn.
Arms
Rnd 1. 6 sc in mr with nude yarn 6
Rnd 2. inc, 5 sc 7
Rnd 3. – 16. 7 sc (14 rows) 7
Rnd 17. With red yarn 7 inc 14
Rnd 18. – 22. 14 sc (5 rows) 14
Rnd 23. 7 dec 7
*** Leave enough long yarn tail and finish. Do not stuff the arms.
Sew the arms on to body under collar.
Wig / Hair
Rnd 1. 6 sc in mr with light grey yarn 6
Rnd 2. 6 inc 12
Rnd 3. 6(sc, inc) 18
Rnd 4. 6(2 sc, inc) 24
Rnd 5. 6(3 sc, inc) 30
Rnd 6. 6(4 sc, inc) 36
Rnd 7. 6(5 sc, inc) 42
Rnd 8. 6(6 sc, inc) 48
Rnd 9. 6(7 sc, inc) 54
Rnd 10. 6(8 sc, inc) 60
Rnd 11. – 19. 60 sc (9 rows) 60
*** The wig is ready. Do not cut your yarn and continue to
crochet hair strands.
Wig / Hair
*** Crochet hair strands only in the last row of the wig.
*** With light grey yarn ch 60, from the 2nd sc 59 sc, skip 1 sc,
slst and ch 60 again for the second hair strand. Skip 2 sc between
every 2 hair strands. (White hair strands will be crocheted into
these spaces. Complete the row by skipping 2 sc between every 2
grey hair strands.) Leave enough long yarn tail to sew and fasten
off.
*** Attach your white yarn to any of the 2 sc spaces in between.
Ch 60, from the 2nd sc 59 sc, skip 2sc and slst. You’ve finished the
first white hair strand. Continue to crochet at the end of the row
in the same way. Complete the wig with one white hair strand
between two grey hair strands.
*** Gather the hair strands with a thin hair clip as shown in the
picture. Divide them into 3 pieces. Gather each strand of hair
from the ends with a thin white thread and needle.Twist them
around. Fasten it with a needle by twisting it around the hair clip.
*** Pin each strand of hair strands at the ends with a needle and
thread, twist them around, and secure them by sewing with a
needle around the hair clip. Complete grandma’s hair bun.
*** You can decorate her hair bun by sewing felt accessories,
buttons, etc.
Apron
Rnd 1. With white yarn ch 9 , from the 2nd ch 8 sc, turn 8
Rnd 2. Ch 1, 8 sc, turn 8
Rnd 3. Ch 1, inc, 6 sc, inc, turn 10
Rnd 4. Ch 1, 10 sc, turn 10
Rnd 5. Ch 1, inc, 8 sc, inc, turn 12
Rnd 6. Ch 1, 12 sc, turn 12
Rnd 7. Ch 1, inc, 10 sc, inc, turn 14
Rnd 8. – 9. Ch 1, 14 sc, turn (2 rows) 14
Rnd 10. Ch 1, skip 1 sc, 11 sc, skip 1 sc, 1 sc, turn 12
Rnd 11. CH 1, skip 1 sc, 9 sc, skip 1 sc, 1 sc, turn 10
Rnd 12. Ch 1, 10 sc, turn 10
Rnd 13. Ch 1, skip 1 sc, 7 sc, skip 1 sc, 1 sc 8
Rnd 14. Cut your yarn. Attach your white yarn from the
right corner to complete the apron and crochet
single crochet in every sc and turn.
Rnd 15. Until the end of the row crochet ch 1, 1 sc, skip 1
sc, into the same sc (3dc, ch 3, 3dc), skip 1 sc, 1 sc,
skip 1 sc, into the same sc (3 dc, ch 3, 3 dc), … in the
same way.
Rnd 16. On the last row of the apron ch 1, 1 sc, ch 5, into ch
space 3 sc, ch 5, 1 sc,… Cut your yarn.
*** To bind the apron, ch 41 on both sides, from the 2nd sc 40 sc
and fasten off.
*** Embroider on the apron with fine black thread.
*** For the heart; ch 3, 3 trc, 3 dc, ch 1, 1 trc, ch 1, 3 dc, 3 trc,
ch 3, slst in mr with red yarn and fasten off. Sew the little heart
with fine black thread on the apron. (like sewing a patch)
Shoes
Rnd 1. With brown yarn ch 6, from the 2nd sc 4 sc, 3 sc
into the last sc, on the opposite side 3 sc, inc 12
Rnd 2. inc, 3 sc, 3 inc, 3 sc, 2 inc 18
Rnd 3. sc, inc, 3 sc, 3(sc, inc), 3 sc, 2(sc, inc) 24
Rnd 4. Join two shoe soles with red yarn on the blo sc. Blo
24 sc 24
Rnd 5. Blo 24 sc 24
Rnd 6. 24 sc 24
Rnd 7. 8 sc, 6 dec (in the middle), 4 sc 18
Rnd 8. 8 sc, 3 dec (in the middle), 4 sc 15
Rnd 9. 15 sc 15
Rnd 10. 1 slst, ch 1, 1 slst, ch 1, … complete the shoe and
cut your yarn.
*** Fill a small amount of fiberfill on the toe of the shoe. Put
them on grandma’s feet.
Pie
Rnd 1. For the pie mold; 6 sc in mr with white yarn 6
Rnd 2. 6 inc 12
Rnd 3. 6(sc, inc) 18
Rnd 4. 6(2 sc, inc) 24
Rnd 5. 6(3 sc, inc) 30
Rnd 6. 6(4 sc, inc) 36
Rnd 7. Blo 36 sc 36
Rnd 8. – 10. 36 sc (3 rows) 36
*** You’ve finished the pie mold. Fasten off.
Rnd 1. For the fruity part of the pie; 6 sc in mr with red
yarn 6
Rnd 2. 6 inc 12
Rnd 3. 6(sc, inc) 18
Rnd 4. 6(2 sc, inc) 24
Rnd 5. 6(3 sc, inc) 30
Rnd 6. 30 sc 30
Rnd 7. 6(3 sc, dec) 24
Rnd 8. 6(2 sc, dec) 18
Rnd 9. 6(sc, dec) 12
Rnd 10. 6 dec 6
Rnd 1. For the crust of the pie; 9(dc, ch 2), slst in mr with caramel yarn
Rnd 2. Ch 2, 9(2 dc, ch 2), slst
*** You’ve finished the fruity part. Do not fill the piece, fasten off
and place it in the mold.
*** Join the piece with the mold by crocheting slst in every sc.
*** On the last row 1 sc, skip 1 sc, into the same sc 3 dc, skip 1
sc, 1 sc, … complete the pie in the same way. Fasten off.
Sew the pie between grandma’s hands with thin white thread.
More Amigurumi Doll İdeas