Cute Crochet Mushrooms Amigurumi Free Pattern
Hello dear Amigurumi Followers
Today we share one free amigurumi crochet pattern again for you. As you know we share new amigurumi free patterns every day. The main crochets are amigurumi gazelles, amigurumi bears, amigurumi pola, amigurumi pandas, amigurumi penguins, amigurumi giraffes, amigurumi llama, amigurumi pigs, amigurumi bunny, amigurumi clowns, amigurumi lambs, amigurumi bees, amigurumi unicorns, amigurumi dolls, amigurumi foxes, amigurumi penguins, amigurumi dinosaurs, amigurumi elephants, amigurumi hippos, amigurumi monkeys, amigurumi cats, amigurumi dogs and more …
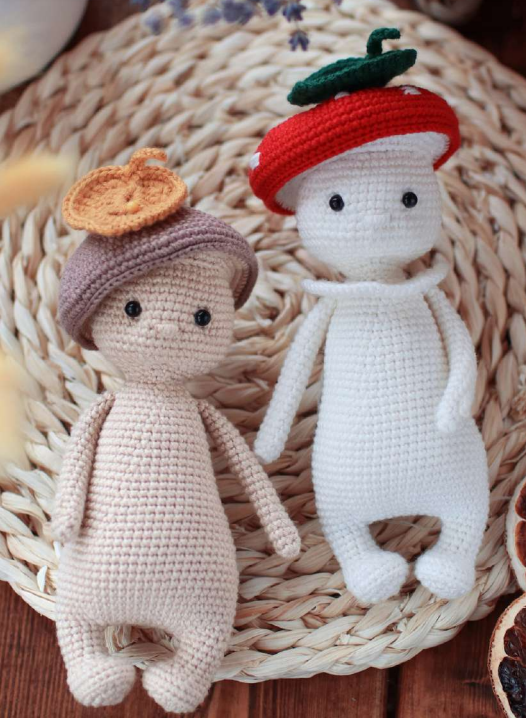
Todays daily new amigurumi free crochet pattern is amigurumi mushroom
I want to give you some informations about this pattern ;
If you enjoy making amigurumi, here I share this easy and free amigurumi pattern for you for free. Your kids will love these toys.
Materials
Porcini mushroom:
YarnArt Baby cotton, 407 (cappuccino color) – 1/3 of a skein;
YarnArt Baby cotton, 404 (beige) – 1/2 of a skein.
Fly agaric:
YarnArt Baby cotton, 426 (red) – 1/3 of a skein;
YarnArt Baby cotton, 401 (white) – 1/2 of a skein.
For leaves:
YarnArt baby cotton or Gazzal baby cotton – yarn color of your choice.
1.75 mm crochet hook Clover (US 4)
2 mm crochet hook Clover (US 6) for leaves crocheting;
4 mm safety eyes (1 pair);
needle;
toy stuffing (fiberfill);
scissors.
YarnArt Baby cotton yarn is stated as recommended. You can take Gazzal Baby Cotton
yarn for substitution.
You can also use YarnArt Jeans or Alize cotton gold yarn – these yarn brands are a little
thicker and the mushrooms will be bigger.
The yarn listed can be substituted with any yarn with similar weight (number 2 in
the Standard Yarn Weight System).
Abbreviations:
sc – single crochet
dec – decrease
inc – increase
sl st – slip stitch
tch – turning chain
ch – chain
BLO – crochet into back loops only
st, sts – stitch, stitches
hdc – half double crochet
dc – double crochet
tr – treble crochet
In this pattern we use US terminology.
Note! All body parts for the porcini mushroom are crocheted with beige yarn; and for the fly
agaric they are crocheted in white.
Arms (make 2):
Arms for porcini mushroom and fly agaric are crocheted in the same way.
1 round – 6 sc in MR
2 round – (1 sc, inc)3 (9)
3-21 rounds (19 rounds) – 9 sc. Fasten off and cut the thread. Do not add fiberfill.
Legs (make 2)
Legs for porcini mushroom and fly agaric are crocheted in the same way.
1 round – 8 sc in MR
2 round – inc8 (16)
3 round – (1 sc, inc)8 (24)
4 round BLO – 24 sc
5 round – 24 sc
6 round – 6 sc, dec6, 6 sc (18)
7 round – 3 sc, dec*6, 3 sc (12)
8-9 rounds – 12 sc
10 round – for the first leg 12 sc + 4 sc, fasten off and cut the
thread.
for the second leg 12 sc + 9 sc, ch10
In the next round we are going to join the legs.
11 round – work the last ch with a loop into the stitch, which
follows the last stitch on the first leg. This stitch will be the first
stitch in the new round. Place marker on this stitch.
The marker and the beginning of rounds should be at the
front side!
When we have the legs joined work: 11 sc around the first leg
(there are 12 stitches in total around this leg, the
first stitch joins our legs), 10 sc across the chain, 12
sc across the second leg, 10 sc across the chain (44)
Body:
The body for the porcini mushroom and for the fly agaric is
crocheted in different way after arms joining. Follow the
instructions.
12 round – 12 sc, (2 sc, inc)3, 13 sc, (2 sc, inc)3, 1 sc (50)
13 round – 11 sc, inc, 12 sc, inc, 11 sc, inc, 12 sc, inc (54)
14-21 rounds (8 rounds) – 54 sc
Add fiberfill.
22 round – (16 sc, dec)3 (51)
23 round – 51 sc
24 round – (15 sc, dec)3 (48)
25 round – 48 sc
26 round – (14 sc, dec)*3 (45)
27-28 rounds – 45 sc
Add fiberfill.
29 round – (13 sc, dec)3 (42)
30-31 rounds – 42 sc
32 round – (12 sc, dec)3 (39)
33-34 rounds – 39 sc
35 round – (11 sc, dec)3 (36)
36-37 rounds – 36 sc
38 round – (10 sc, dec)3 (33)
39 round – 33 sc
Add fiberfill.
40 round – (9 sc, dec)*3 (30) and crochet 16 sc additionally. We need to shift the
beginning of rounds.
In the next row we are going to join the arms by crocheting
through both pieces layers. Before crocheting, mark the points
where the arms will be located with pins. They should be
located on the sides, a reference point is in the middle of the
leg. You can crochet according to my calculations, but they
might not work for you because of different crochet density
and the arms might be shifted.
41 round – 4 sc, 5 sc together with the arm through both layers, 11 sc, 5 sc together with the arm through both
layers, 5 sc (30)
For fly agaric crochet the round 42 BLO.
42 round – (3 sc, dec)6 (24)
43 round – (2 sc, dec)6 (18)
Add filler. Fasten off and cut the thread
The ring for the fly agaric:
Attach the thread to the front loop of the round 41.
1 round – (1 sc, inc)*15 (45)
2 round – 45 sc
3 round – (2 sc, inc)*15 (60)
4 round – 60 sc. Cut the thread, fasten off, weave in the thread.
Head:
1 round – 6 sc in MR
2 round – inc6 (12)
3 round – (1 sc, inc)6 (18)
4 round – 1 sc, inc, (2 sc, inc)5, 1 sc (24)
5 round – (3 sc, inc)6 (30)
6 round – 2 sc, inc, (4 sc, inc)5, 2 sc (36)
7 round – (5 sc, inc)6 (42)
8 round – 3 sc, inc, (6 sc, inc)5, 3 sc (48)
9-18 rounds (10 rounds) – 48 sc
19 round – (4 sc, dec)8 (40)
20 round – (3 sc, dec)8 (32)
Add fiberfill. Find the points, where the eyes will be located and mark them with pins for the most successful location. My mushrooms have the eyes located between the rounds 13 and 14 . The distance between the eyes is 9 stitches. Pull the filler out, insert and fix the eyes, stuff the head again.
21 round – (2 sc, dec)8 (24)
22 round – 24 sc
23 round – (2 sc, dec)*6, sl st (18)
*If necessary, crochet a few extra sc to match the end of
the rounds on the head and on the neck. It is necessary to
do that to make the head to be evenly attached after being
sewn to the neck.
Leave a long thread tail for sewing.
Sew the head to the body. When sewing, add filler to the
neck to prevent the head from wobbling.
Details:
Needle sculpting. You will need a long
needle and a strong thread (or you can use the yarn
you have used for the body). Insert the needle into
the head bottom (1) and pull out under the right eye
(2), reinsert, leaving one stitch (3) and pull out under
the left eye (4), reinsert again leaving one stitch (5)
and pull out from the head bottom (6), out from the
point where we have started (1). Now start to pull
both thread ends carefully. You can push on the eyes
with your fingers for deeper needle sculpting. Then
secure the thread and tie several knots. Weave in the
thread ends. The needle sculpting is done.
Now we are going to embroider the nose. To do
this, we need a needle and the yarn, which was
used for mushrooms. The nose is located
between the rounds 15 and 16, the width is 2
stitches. First, we need to make several
horizontal stitches. Then we wind our
yarn around these stitches with several vertical
stitches.
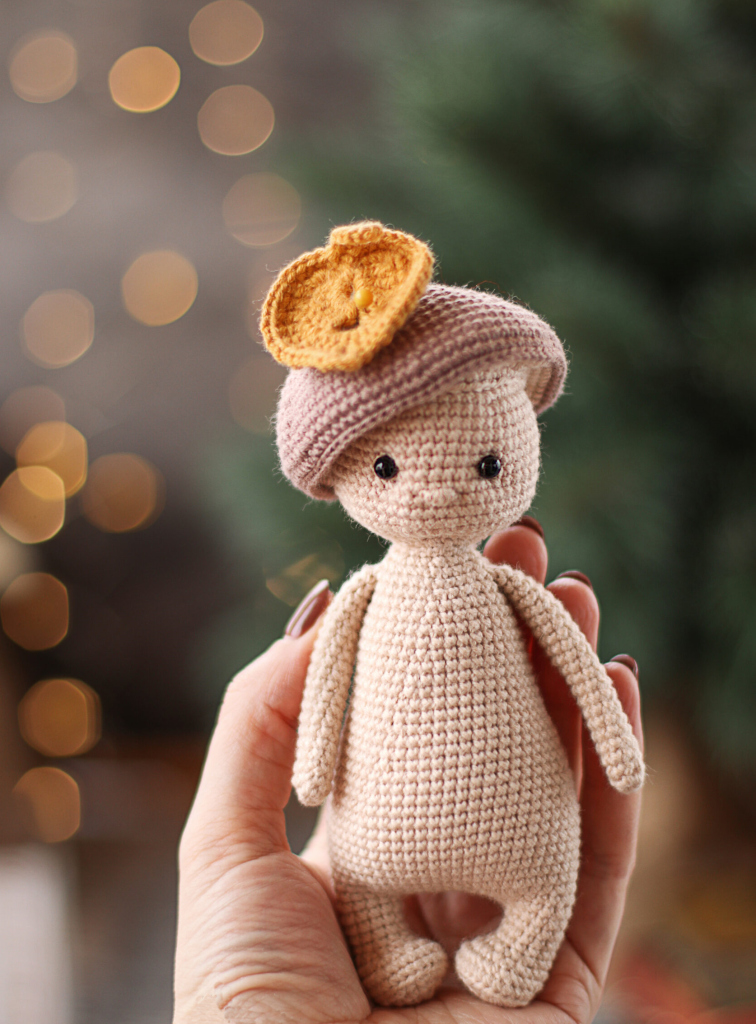
Porcini mushroom cap:
Start to crochet with coffee-colored yarn.
1 round – 8 sc in MR
2 round – inc8 (16)
3 round – (1 sc, inc)8 (24)
4 round – (3 sc, inc)6 (30)
5 round – 2 sc, inc, (4 sc, inc)5, 2 sc (36)
6 round – (5 sc, inc)6 (42)
7 round – 3 sc, inc, (6 sc, inc)5, 3 sc (48)
8 round – (7 sc, inc)6 (54)
9 round – 4 sc, inc, (8 sc, inc)5, 4 sc (60)
10 round – 60 sc
11 round – (9 sc, inc)6 (66)
12 round – 66 sc
13 round – 5 sc, inc, (10 sc, inc)5, 5 sc (72)
14-15 rounds – 72 sc
16 round – (11 sc, inc)6 (78)
17 round – 78 sc
Change the color of the yarn to beige.
18 round BLO – 78 sc
19 round – (11 sc, dec)6 (72)
20 round – (4 sc, dec)12 (60)
21 round – (3 sc, dec)12 (48)
Leave a long thread tail for sewing.
Attach the coffee-colored thread to the front loop of the round
17, Crochet 78 sl sts around. Cut
the thread, fasten off, weave in the thread tail.
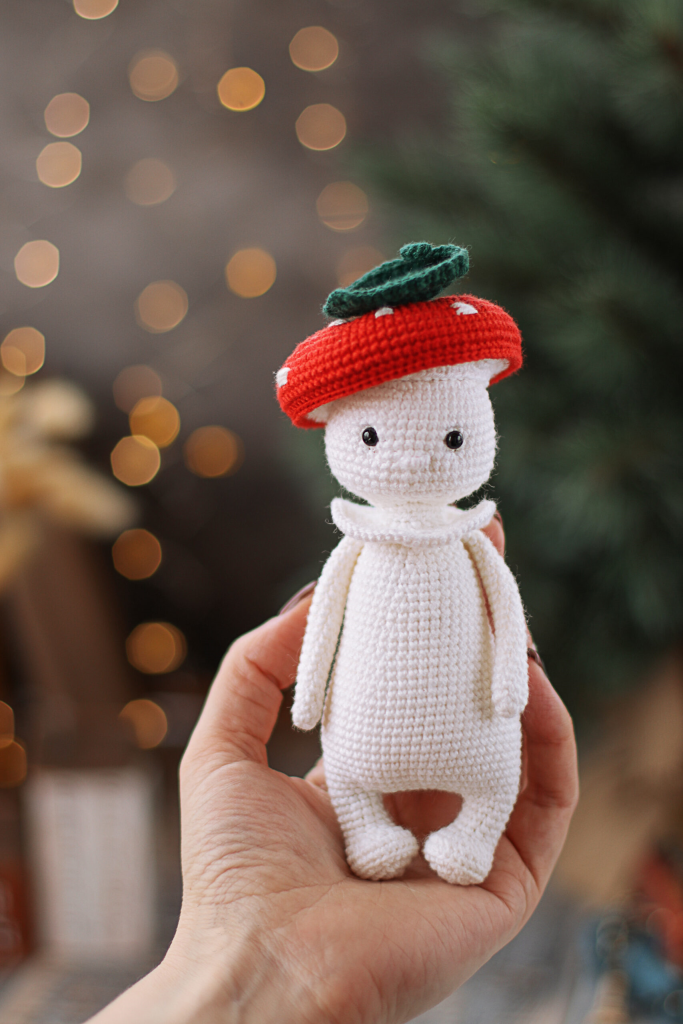
Fly agaric cap:
Start to crochet with red yarn.
1 round – 8 sc in MR
2 round – inc8 (16)
3 round – (1 sc, inc)8 (24)
4 round – 1 sc, inc, (2 sc, inc)7, 1 sc (32)
5 round – (3 sc, inc)8 (40)
6 round – 2 sc, inc, (4 sc, inc)7, 2 sc (48)
7 round – (7 sc, inc)6 (54)
8 round – 4 sc, inc, (8 sc, inc)5, 4 sc (60)
9 round – (9 sc, inc)6 (66)
10 round – 5 sc, inc, (10 sc, inc)5, 5 sc (72)
11 round – (11 sc, inc)6 (78)
12-15 rounds (4 rounds) – 78 sc
The top of the cap is ready. Now you need to embroider the
white spots on the cap. Prepare the white thread and a
needle. You can use the thread, which was used for the
mushroom. Embroider the spots in random order, but not too
close to each other.
Change the color of the yarn to white.
16 round BLO – 78 sc
17 round – (11 sc, dec)6 (72)
18 round – (4 sc, dec)12 (60)
19 round – (3 sc, dec)*12 (48)
Leave a long thread tail for sewing.
Attach the red thread to the front loop of the round 17
Crochet 78 sl sts around. Cut the
thread, fasten off, weave in the thread tail.
Sewing on the cap:
Don’t stuff the hat.
Mark the location for the cap on the head. Do not push it
deeply and it is better to place it slightly on the side.
Fix this position with pins or needles.
Sew the cap to your head.
Now you can give the cap the desired shape by pressing on it
and placing it more tightly on your head. You can tilt the cap
to any side.
For example, the cap of this porcini
mushroom is placed with a slight
shift to the left side.
Leaf:
Choose the color for the leaf at your discretion. Use 2 mm
crochet hook (US 6).
1 round – make ch7, join in a circle, making sl st.
2 round – make ch5. Next, crochet 6 tr into the ring, formed
out of ch7 (1 round), make ch3, 6 tr into the ring,
ch5 and sl st.
3 round – crochet 5 sc into the arc (arc formed of ch5 in the
second round), hdc into the first loop above the first tr, next, 5
dc into each stitch, /into the arc 2 dc, 1 tr, ch2, 1 tr,
2 dc /, 5 dc into each stitch, hdc, 5 sc into the arc, sl
st .
4 round – 6 sc, inc6, 2 sc, /in the arc hdc, 3 ch, hdc/, 2 sc, inc6, 6 sc, sl st.
Petiole:
Continue crocheting, make ch8 and start crocheting from the
second ch from the hook 7 sl st.
Leave the thread for sewing the leaf to the cap.
Mark the location for the leaves on the cap as you like and sew. Weave in the thread tails.
More Amigrumi Mushroom İdeas