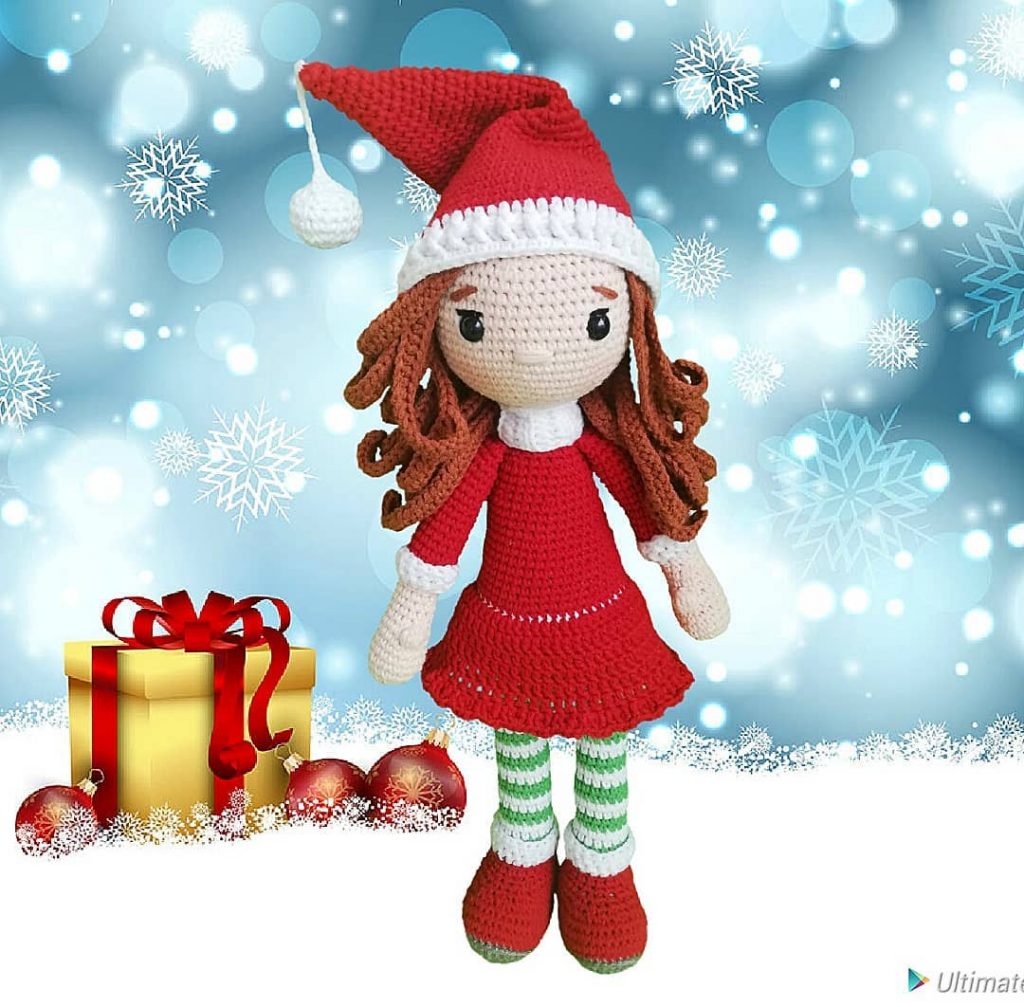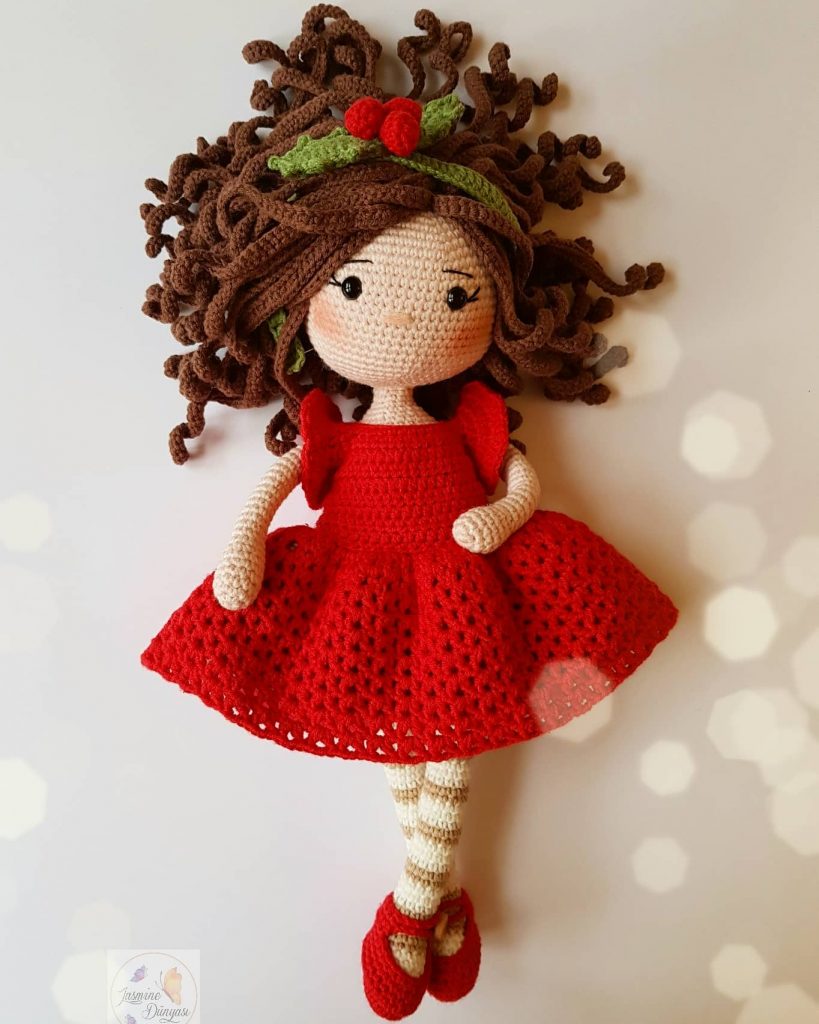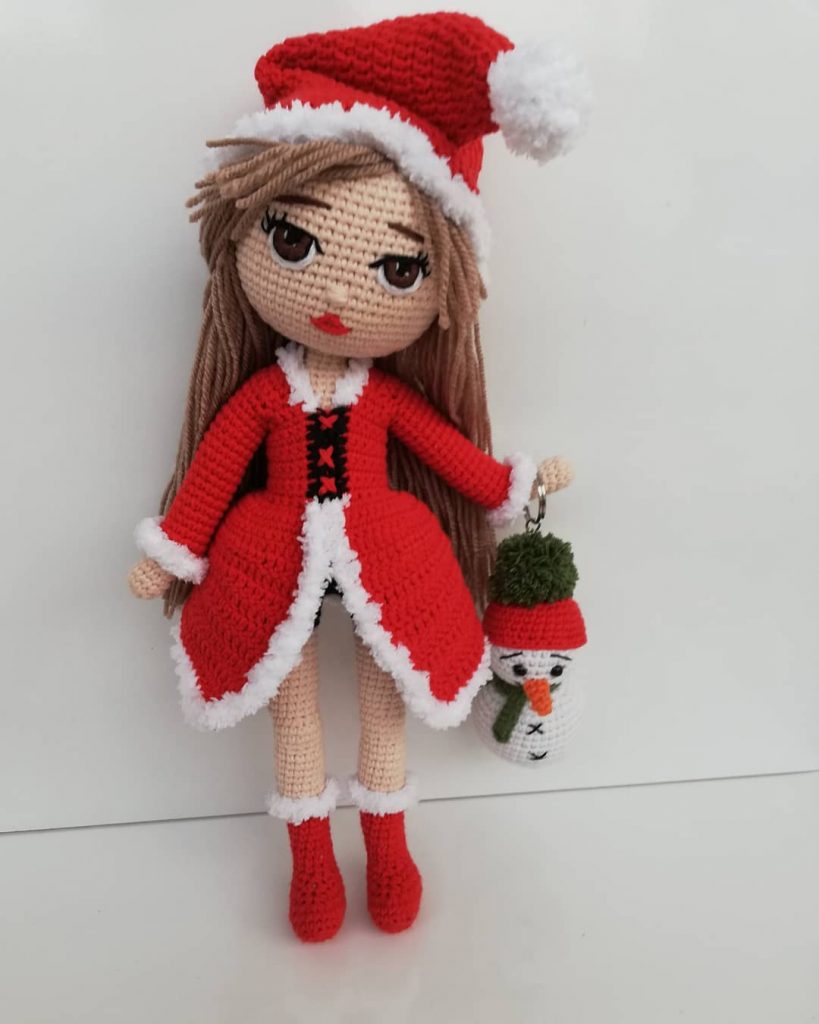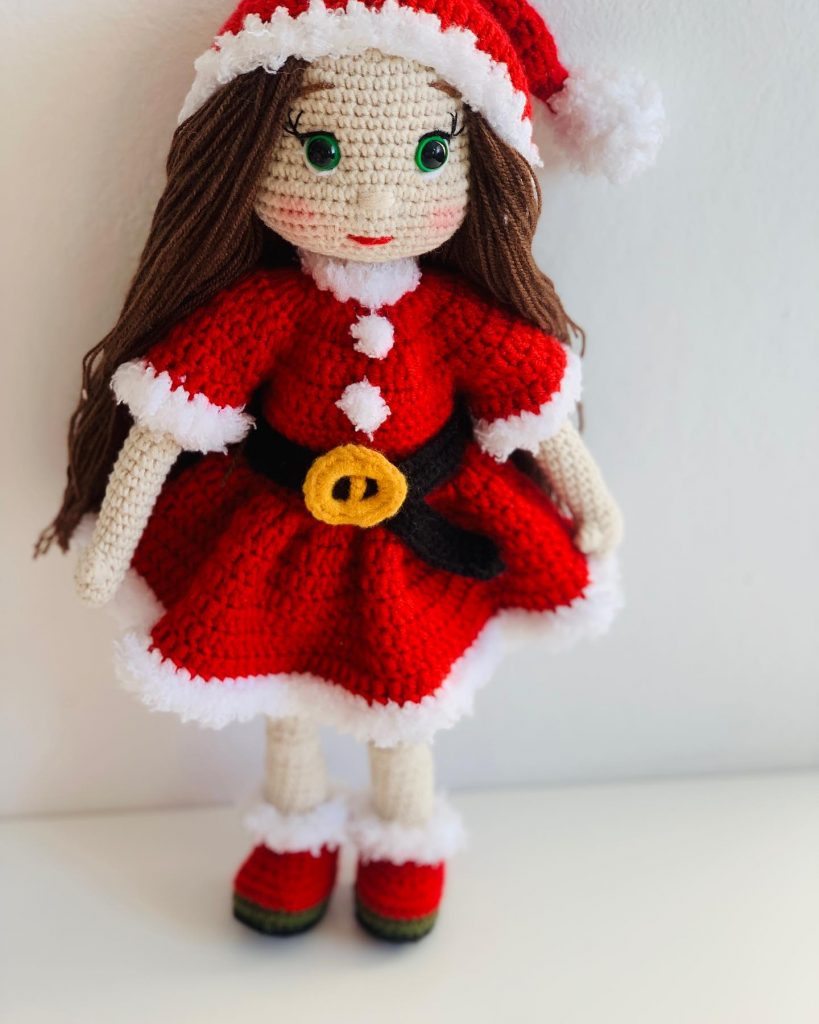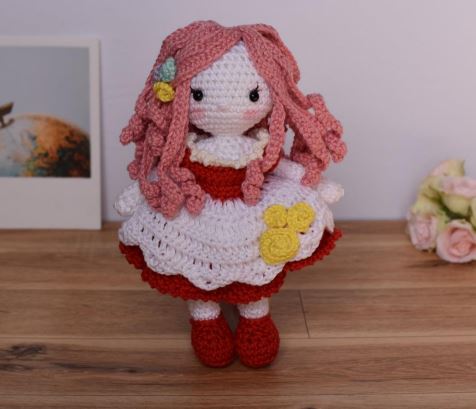
Phoebe Christmas Doll Amigurumi Free Pattern
Hello dear Amigurumi Followers
Today we share one free amigurumi crochet pattern again for you. As you know we share new amigurumi free patterns every day. The main crochets are amigurumi gazelles, amigurumi bears, amigurumi pola, amigurumi pandas, amigurumi penguins, amigurumi giraffes, amigurumi llama, amigurumi pigs, amigurumi bunny, amigurumi clowns, amigurumi lambs, amigurumi bees, amigurumi unicorns, amigurumi dolls, amigurumi foxes, amigurumi penguins, amigurumi dinosaurs, amigurumi elephants, amigurumi hippos, amigurumi monkeys, amigurumi cats, amigurumi dogs and more …
Todays daily new amigurumi free crochet pattern is amigurumi doll
I want to give you some informations about this pattern ;
If you enjoy making amigurumi, here I share this easy and free amigurumi pattern for you for free. Your kids will love these toys.
Materials
– Phildar Phil Coton 3 blanc / white
– Phildar Phil Coton 3 Cerise/red
– Phildar Phil Coton 3 Meringue/ Pink
– Phildar Phil Coton 2 Jade
– Phildar Phil Coton 2 Citron/ yellow
– Phildar Phil Coton 2 blanc/ white
– Phildar Phil Coton 2 Lavande/Purple
– 3mm crochet hook and 2 mm crochet hook
– 1 pairs of 6 mm safety eyes
– Toy filling
Abbreviations
MR: magic ring
ch: chain
sts: stitch(es)
slst: slipstitch
Sk: skip
Sc: single crochet
Inc: increase
Dec: decrease
Dc: double crochet
hdc: half double crochet
FLO : Front loop only
BLO : Back loop only
rep: repeat
(number) : number of stiches in the round or stripe
Tip
– You should use the Cross Stitch Single Crochet to make a beautiful doll. You can find
how to do the cross stich single crochet in youtube.
– Each round will be worked in a continuous spiral. Do not join rounds with slip stitch or
turn unless the pattern indicates changes.
– Use a stitch marker to mark the ending of the round. Move the stitch marker after finish
each round.
– If you make toy for children, be careful with the safety eyes. I recommend you embroider
the eyes.
– Color change: You should finish the last step of the last single crochet with the new yarn.
– It’s highly recommended that you read through the pattern completely before making the
doll.
ARM (Make 2)
Use the white yarn and 3mm crochet hook
Remark: Each round will be worked in a continuous spiral. Do not join rounds with slip stitch or
turn.
R 1: 7 sc in the magic ring(7)
R 2 – R 14: 7sc (7)
Fasten off. Stuff a little bit with the fiberfill.
LEGS (Make 2)
Remark: End every round with 1 slst and begin with a chain (ch 1). You should stuff these
parts little by little as you crochet them, making the process easier.
Use the red yarn and 3mm crochet hook
R1: 6 sc in the magic ring(6)
R2: 6 inc (12)
R3: (1sc, 1inc) * 6 (18)
R 4: BLO, 18 sc (18)
R 5: 18 sc (18)
R 6: 5sc, 4 dec, 5sc (14)
R7: 5sc, 2 dec, 5 sc (12)
R8: 5sc, 1 dec, 5 sc (11)
Change the white yarn
R9: BLO, 11 sc (11)
R 10 – R 21: 11 sc (11)
( Go to R9, use the red yarn, insert 1 sc, FLO, 11 slst)
Cut and secure the thread. Make the other leg but don’t cut the thread and continue working the
body.
BODY
Remark: Each round will be worked in a continuous spiral. Do not join rounds with slip stitch or
turn.
Still using the chosen yarn and the 3mm hook, continue working and put the second leg near to
the first one and go ahead with these steps:
R1: sc in the following 8 sts of the second leg, Chain 2 and join with the first leg, sc in the first
stitch of the first leg, sc in the following 10 sts of the first leg, 2 sc in 2ch, sc in the following 3
sts of the second leg place a stitch marker in the last sts [26]
R2: 8sc, 2inc, 11sc, 2inc, 3 sc (30)
R 3: (4sc, 1inc) *6 (36)
R 4: 36 sc (36)
R5: (4sc, 1dec) *6 (30)
R6: (3sc, 1 dec) * 6 (24)
R7 – R8: 24 sc
R9: (4sc, 1 dec) * 4
R10: (3sc, 1 dec)4 (16)
R 11- R 12: 16 sc
R 13: (3sc, 1 inc)4 (20)
Continue to join arms to body
R14: 5sc, 7 sc (on left arm), 10sc, 7sc (on right arm), 5sc (34)
R15: 34 sc
R 16: 4sc, 1dec, 6sc, 1dec, 1sc, 2dec, 1sc, 1dec, 6sc, 1dec, 4 sc (28)
R17 : 4sc, 10 dec, 4 sc (18)
R 18 : (1sc, 1dec) *6
R 19 : (2sc, 1dec) * 3
R 20 – R 21 : 9sc
Do not fasten off, to continue with head.
Stuff the body and insert soft wires inside the body.
HEAD
Remark: Each round will be worked in a continuous spiral. Do not join rounds with slip stitch or
turn.
R1: 9 inc (18)
R 2: (2sc, 1inc) * 6 (24)
R 3: ( 2sc, 1inc) * 8 ( 32)
R 4: ( 3sc, 1 inc) * 8 (40)
R 5 – R 12: 40 sc (40)
R 13: ( 3sc, 1 dec ) * 8 (32)
R 14: (1 sc, 1 dec, 1 sc) * 8 (24)
R 15: ( 1sc, 1dec ) * 8 (16)
R 16: 8 dec (8)
FO and leaving a long tail to sew. close the opening tight.
MAKE UP
– Make eye sockets, sew eyelashes, glue eyes between R 6 and R7 of the head at about 8
sts apart.
– Embroider the nose between row 16 and 18
– Apply pink blush on the doll face.
ROSE
Use the 2 mm crochet hook and phildar phil coton 2.
Big rose ( Make 1)
Chain 25, start from 2nd from hook, 24 inc, ending the row with a sl st. Finishing : Roll the rose
and sew it together through the bottom!
Midium rose (Make 1)
Chain 12, start from 2nd from hook, 11 inc, ending the row with a sl st. Finishing : Roll the rose
and sew it together through the bottom!
Small rose (Make 4)
Chain 9, start from 2nd from hook, 8 inc, ending the row with a sl st. Finishing : Roll the rose
and sew it together through the bottom!
HAIR
Use the pink yarn and 3 mm crochet hook.
R1: 6sc in MR (6)
R2: 6inc (12)
R3: BLO, (1sc, 1inc) *6 (18)
R 4: slst, (ch 38, start from 2nd from hook, (4sc, 1inc) *3, 22 sc, slst to next st, ch 38, start from
2nd from hook, (4sc, 1inc) *3, 22 sc, slst into the previous st, ch 38, start from 2nd from hook,
(4sc, 1inc) *3, 22 sc, slst to next st) * 9 (27 strands of hairs) ( The bottom layer of hair)
FO.
Go to R3, insert 1 sc: FLO, (ch 38, start from 2nd from hook, (4sc, 1inc) *3, 22 sc, slst to next 2
st ) * 6 (6 strands of hairs) (The top layer of hair)
ADD HAIR
The first layer of hair : Using pin to secure each strands of hair onto head to cover all spaces for
bottom layer of hair except for 10 strands of hair of the bottom layer at the front and the top layer
of hair.. Slowly glue each strands of hair. (Video add hair part 1: https://youtu.be/VomA9QdJLl4 )
The second layer of hair: After the first layer is dry, you secure each strands of hair onto head.
Slowly glue 2 strands of hair in the left side and 1 strands of hair in the right side like the picture
below. You remove the pin of others strands of hair of the second layer and let them free, don’t
glue them. ( Video Add hair part 2:
https://www.youtube.com/watch?v=KwppzpI4gjE&feature=youtu.be )
Glue 3 small roses on the hair.
DRESS
Use the red yarn and 3 mm crochet hook
Row 1 : ch 39, 38sc, turn back (38)
Row 2 : ch2 (count as hdc), 37 hdc, turn back (38)
Row 3: ch 1, 5sc, sk 8 ssts, 12sc, sk 8sts, 5sc, turn back (22)
Row 4: 22 sc, turn back (22)
Row 5-6: 22 sc, turn back (22)
Ro 8: BLO, ch3 (count as dc), dc in same sts, 2 dc in same sts * 21, join by 1 slst (44)
R9: ch 3 (count as dc), dc in same sts, dc in next st, (2dc, 1dc) * 21, join by 1 slst ( 66)
R 10 – R 12: ch 3 (count as dc), 65 dc, join by 1 slst (66)
R 13: (Ch 2, 1 sc ), repeat () to the end.
FO.
Go to R8, use the white yarn, insert 1 sc.
R 1: FLO, ch3 (count as dc), dc in same sts, 2 dc in same sts *21, join by 1 slst (44)
R2: ch 3 (count as dc), dc in same sts, dc in next st, (2dc, 1dc) * 21, join by 1 slst ( 66)
R 3 – R 4: ch 3 (count as dc), 65 dc, join by 1 slst (66)
R 5: (slst, 1 sc, 1 hdc, 1dc, ch 2, 1 dc in same st, 1 hdc, 1 sc), repeat () to the end.
FO.
The collar
Use the 2mm crochet hook and the white yarn phidar phil coton 2.
Go to R1 of the dress. Keep the right side of the work facing you like
R1: Insert 1 sc in the R1 of the dress. 38 slst (38)
R 2: (ch 3, 1sc), repeat () to the end.
FO.
Use the remain tail to chain of 6 stitches (or long enough to accommodate the size of button that
you have). Join it back to the start point with a slip stitch to make a small loop and weave in the
end. Sew a tiny button on the opposite side to the loop.
Sew 3 roses ( 1 big, 1 midium and 1 small) to the dress
More Amigurumi Doll İdeas